In part 1 I’ll go through a bit of the why, planning and inspiration.
I started some collections a year back and as I had a lot of extra cards I started selling the extra ones I had on ebay. One thing led to another and I’m now buried in trading cards and stickers from various collections but mostly football. The ebay shop grew also as I started selling extras from all the collections and after a while I just started buying good offers just for the shop. One of the first challenges I had was keeping inventory accurate. It was doing that in google sheets at first but quickly moved on building my own tool for that so I can quickly upload new stickers and cards by taking photos of them and removing numbers from inventory after orders by just putting a list of numbers in (tool will probably be a different blog post).
Once I had the basic inventory out of the way I started looking at how to solve the other big problem I had: sorting the cards I bought and merging with the existing inventory is manual work that I enjoy doing but it was taking more and more of my free time. Building orders is also a manual job, and especially for big orders it can take evening time away from my gaming time :P.
I started researching for a ready made solution for sorting cards, either existing guides or just to buy a pre made robot. I did find some things but they were either not really suitable for what I needed or very expensive or both. Some of the things I found:
- https://www.instructables.com/Card-Sorter-for-a-Trading-Card-Machine/ -> this looked massive and difficult to build. I couldn’t possible build this as I don’t have a lot of space.
- https://www.rocarobotics.com -> these guys have a nice product but its very expensive and only works for magic cards
- https://www.magic-sorter.com -> this again is a nice product but very expensive and only works for magic cards. I could find video reviews and examples of how this one works and I ended up using this as inspiration for some of the things I ended up building. This is a nice video review of it. You can see it working and some details up close: https://youtu.be/NL9_IHxeAOU
So with that in mind I started thinking how my robot would look like and work. With that in mind I drew a little cad sketch of what I think this could be while researching a bit around linear motion and controlling mention. It also helped I had a couple of friends to exchange ideas with and they were able to pitch in and contour my thoughts. Thanks Vitaliy and Marius!
This is my initial sketch:
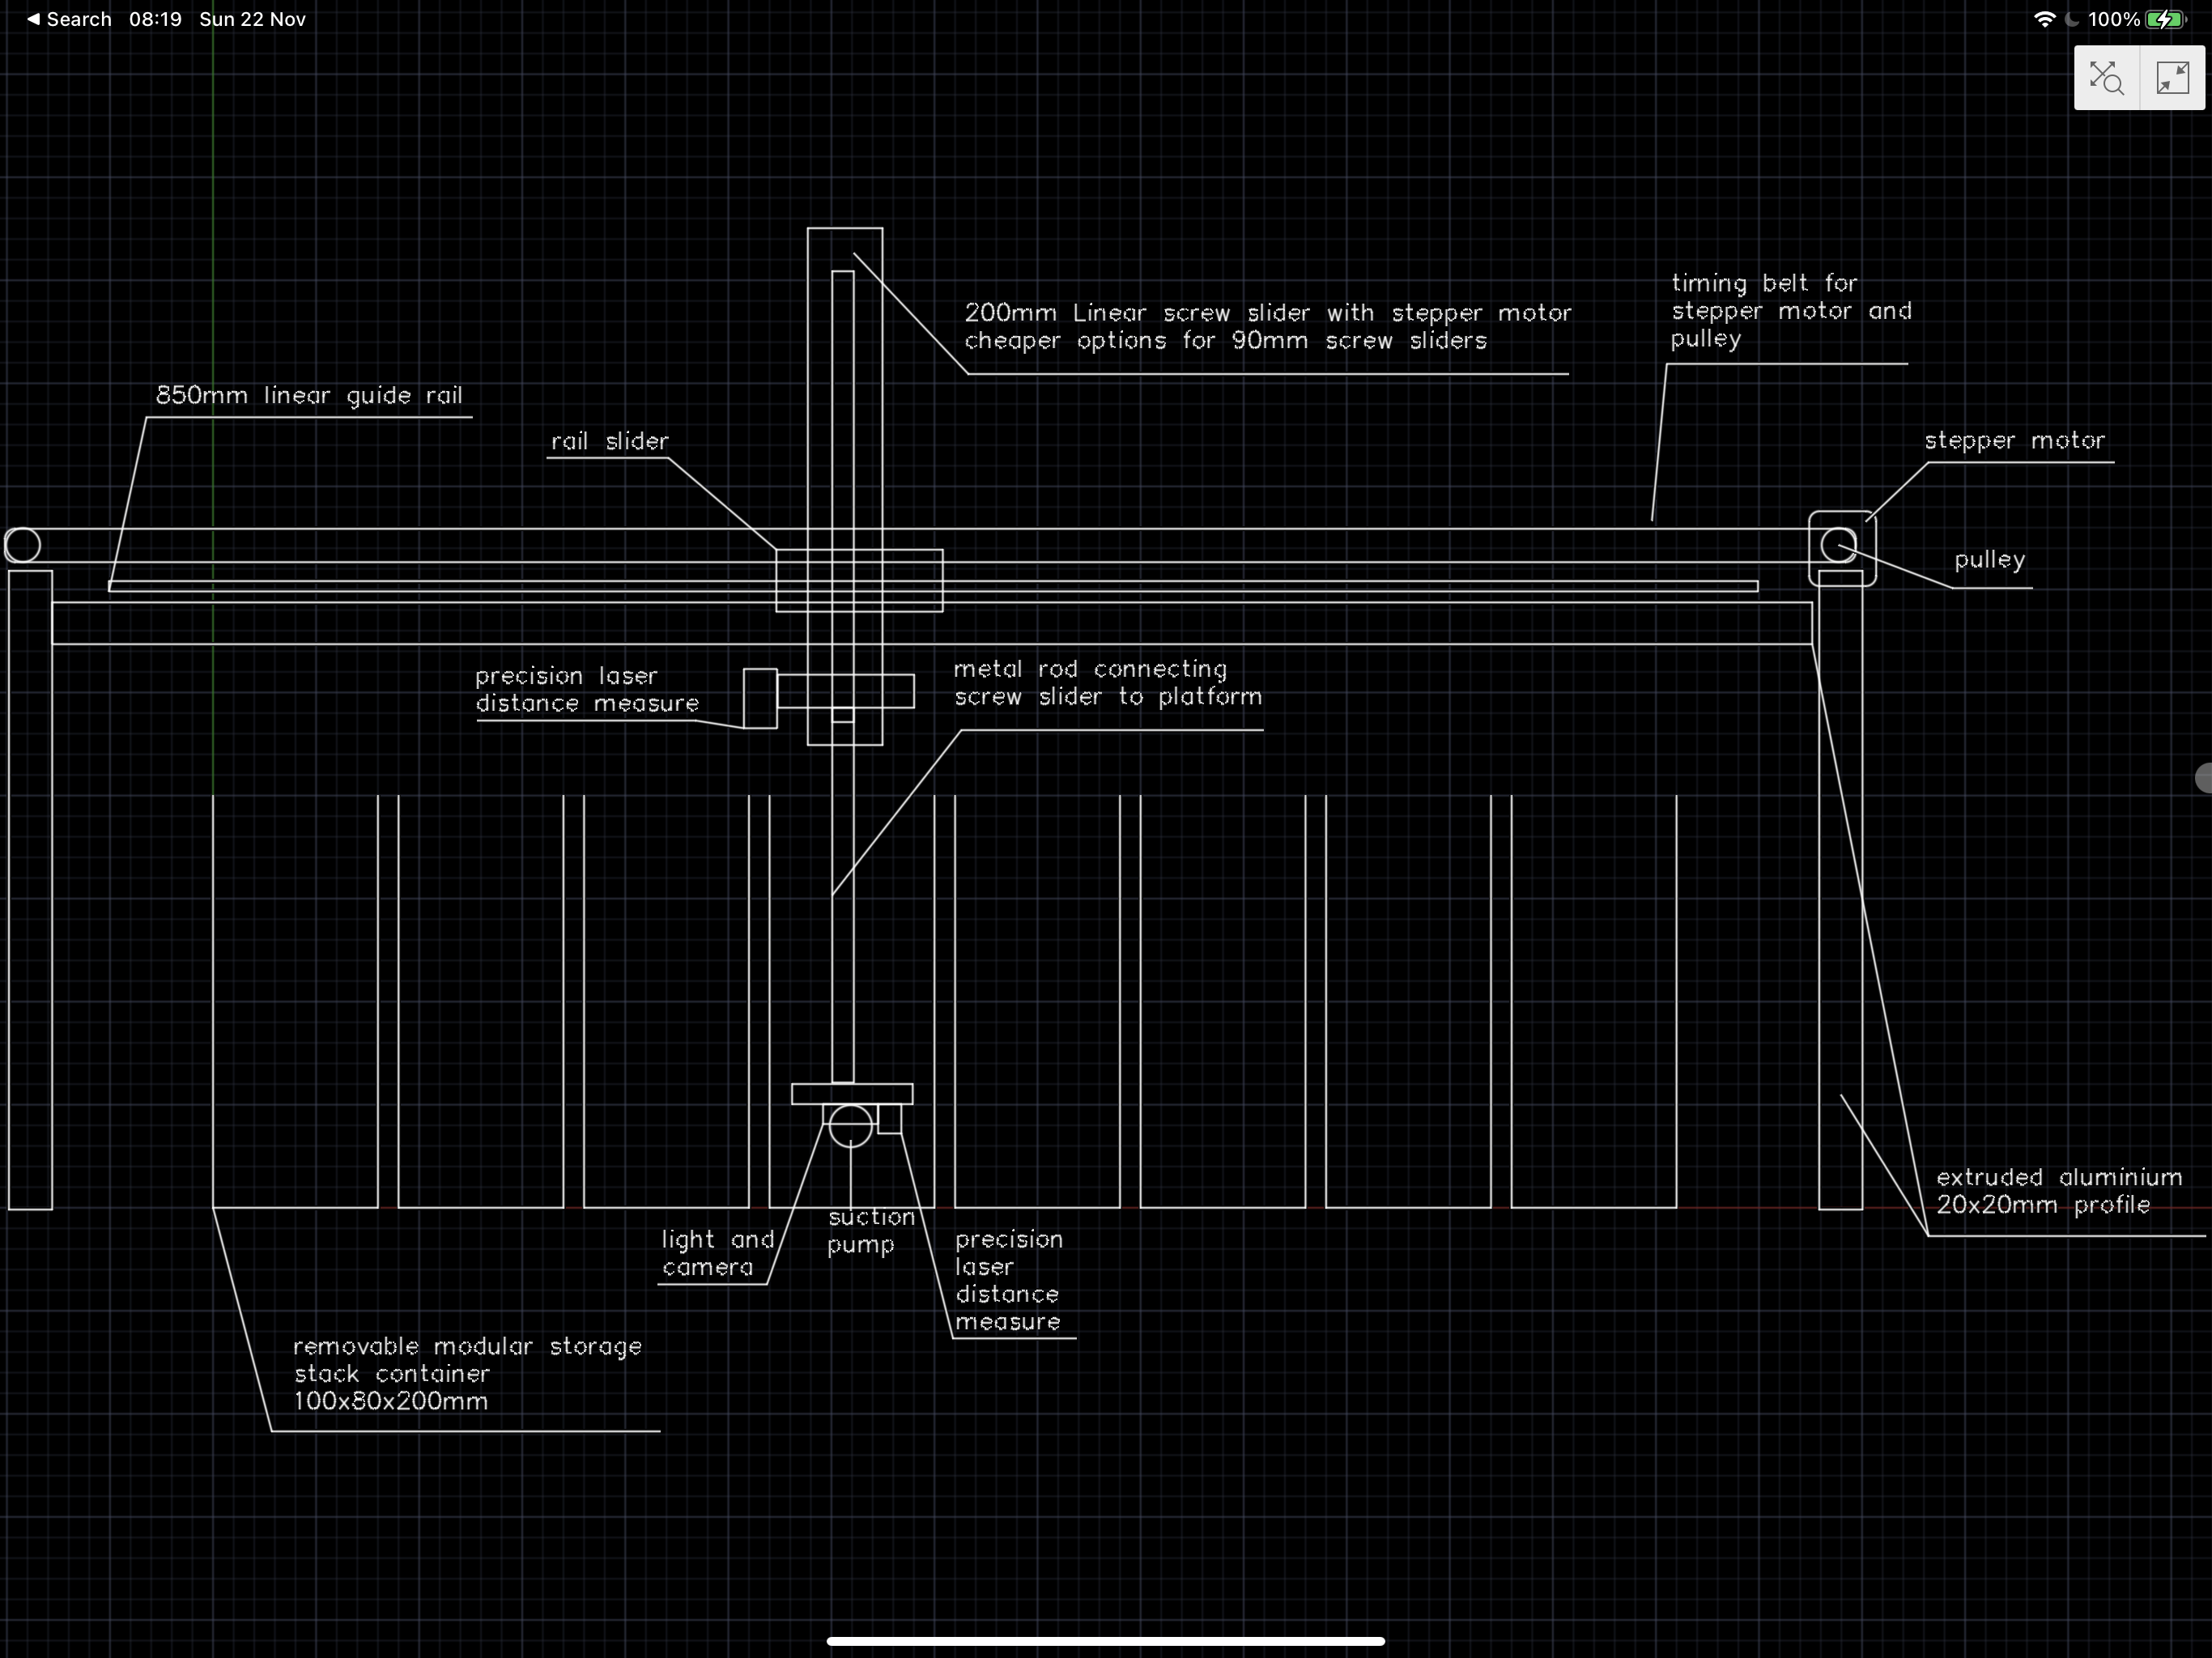
The sketch is a simplification of the magic sorter machine. It only moves on the X axis while the magic sorter has X and Y axis movement. The main idea is to move a crane from left to right on the X axis. Get to the right pile of cards. Move the crane down on the Z axis. Pick up the card and move it to another position.
The main components identified are:
- A sturdy frame to support things -> After some investigation this turns out to be extruded aluminium. Very easy to use and buy and quite common in CNC machines.
- A way to move the carriage platform on the X axis (left to right and back). This again turned up to be a common thing in CNC machines called a linear belt driven actuator
- A way to move the carriage platform on the Z axis (up and down). This turned out to be a lead screw linear actuator. CNC! Again:)
- A way to manipulate and detect cards on the platform. This will be a combination of sensors, suction cups and camera.
What I discovered while planing this robot and learning about the technologies (as I know nothing when going in) is that what I was actually building was a CNC machine ( computer numerical control machine ). It is a very common machine and there are loads of patterns and information and even prebuilt parts out there. Common CNC machines are: 3d printer, engraving machines, plotters etc. After I discovered this things became a bit easier:)
I discovered this website: https://openbuilds.com which is amazing! It will have guides, blueprints, parts lists to build most of the things you can think of. I ended up using two of their blueprints when building the X and Z axis motion. I ended up ordering everything I needed for the frame and linear motions from this site: https://ooznest.co.uk/. They basically use openbuilds blueprints and let you customise for your needs and send all the parts out to you by post including the motors. You only have to assemble it. They even add links to the youtube video tutorial on assembling the kits!
- https://ooznest.co.uk/product/nema17-acme-lead-screw-linear-actuator/#profile-length
- https://ooznest.co.uk/product-category/parts/mechanical-parts/linear-actuators/
This made things very easy for me. Initially I was trying to figure out all the parts and how they work together on their own but openbuilds saved my project. But if you don’t have access to ooznest directly you can always just get the parts-list from openbuilds and order the components you need form whatever suppliers delivers to you: https://openbuilds.com/builds/v-slot®-nema-17-linear-actuator-belt-driven.80/
The only thing I ended up not buying as part of the kits was the controller boards. I chose not to buy them because they don’t seem to be directly compatible with the raspberry PI. And by this point I decided to use a raspberry PI for all the logic and controlling of the robot itself. More on that in the next post!
Here is a teaser of the robot in action:
Part two is now ready to read here: https://nadejde.com/2021/02/03/building-sticker-1-linear-motion/

One thought on “Building Sticker 1 – Planning”